Friday, May 27, 2011

Zoomy Automatically Enlarges Websites To Fill Empty Space [Chrome]

For people who spend the better part of the day in front of a screen and have to browse multiple sites, a widescreen means a better viewing experience but web pages that are viewed on wider screens show white space on either sides which is just a waste of space. If you’re using a widescreen monitor, you can either use the extra space to resize and fit two windows in it or zoom in for a closer look. For a closer look, Zoomy can be a useful extension. Built for Chrome, it will automatically zoom in on a web page when it detects empty space on either sides.


Youtube before

The extension works automatically and magnifies the webpage so that it fits in your window. The extension is set to auto zoom by default but you might not want to fit a web page in the entire window; just zoom it a little. You can manually set the zoom level according to your comfort level. If you’re working on a wide screen and using a remote keyboards it can ensure whenever you view a page or document in Chrome, it’s zoomed in for optimum visibility. You can also restrict the extension from auto fitting certain pages from the extension options. Pages have to be reloaded each time a change is made to the extension’s settings.

youtube after
Install Zoomy For Chrome

Get Kaspersky Internet Security 2010 Key For 1 Year

At the moment of writing, in most places Windows 7 has already launched and is going to launch in the rest of the world within 9 hours. We all know that Panda is giving away 1 year license of Panda Internet Security 2010 for free today, now Kaspersky is following suit.

UPDATE: It seems like Kaspersky 2010 is not free for everyone. It can only be grabbed by those people who attended the Windows 7 Host Party, since it requires Host Email. My bad. :(
UPDATE 2: You can however give Panda Internet Security 2010 a try. It is free for everyone today.
Kaspersky has announced that they are giving away 1 year license of Kaspersky Internet Security 2010 for free today. Kaspersky has made quite some name in the antivirus industry and getting a copy for free is sure going to put some smiles on people’s face.
The original price for this antivirus is $59.95, but on 22nd October it will be free(today). They have made a special offer page from where users can grab a copy for free.
kaspersky internet security 2010

Screenshot of KS Internet Security 2010 running on XP taken from developer’s page.

The latest version is fully compatible with Windows 7, so you shouldn’t have any problem running it. It includes many new features including the Safe Run Mode.
Kaspersky Internet Security 2010

Download Unofficial Google Chrome OS

We all know that Google Chrome OS is in development and will hit the netbooks by Q4 2010. But if you want to get somewhat geeky and try out Chrome OS, then you can install the custom-build Linux OS that puts Google Chrome browser at the center of everything.

This custom-build was made by a Google fanboy, who like you couldn’t wait to get the Google-feel in the operating system.
chrome os
So what is included in it? It loads up with a Chrome icon and comes with GNOME 2.24 desktop environment. By default the apps link to GMail, Google Calendar, and other Google app services. It also carries a OpenOffice in case you want to work with documents. Most importantly as Lifehacker puts it, “It holds the latest development copy of Google Chrome inside, along with a pre-built Flash plug-in”.
Both ISO and VMDK(Virtual image) are given for download. Virtual images can be opened with either VMwarePlayer or VirtualBox.

Download Unofficial Google Chrome OS

Unless you are one of those Linux geeks who work around various Google apps, this is not for you. Enjoy!

Will Watching Movies In 3D Affect Your Health?


People suffering from eyes diseases such as amblyopia or lazy eye cannot see movies in 3D. However, that is the least of the vows of people suffering from headaches, nausea and dizziness after watching 3D. As this technology enters the cinemas, games and even our TV sets, we look at the implications of 3D technology and possible health hazards that it may cause.

Although there is news that the first installment of Harry Potter And The Deathly Hallows may not be released in 3D, however, it is quite likely that not just the next part of Harry Potter (Harry Potter And The Deathly Hallows  2) will be released in 3D but also many other mainstream movies in the near future. People are already divided in two opposing segments comprising the fans and haters of 3D movies and technology. It is a well known fact that people with eye problems can not only find it difficult (if not impossible) to watch 3D based imagery, but also suffer from health issues.

A few weeks ago Samsung posted a warning on their Australian website, saying that, “Some viewers may experience discomfort while viewing 3D TV such as dizziness, nausea and headaches. If you experience any such symptom, stop viewing 3D TV, remove 3D Active Glasses and rest. A responsible adult should frequently check on children who are using the 3D function. If there are any reports of tired eyes, headaches, dizziness, or nausea, have the child stop viewing 3D TV and rest”.
It has also been learned that watching 3D for some people can even lead to Photosensitive and Epileptic seizure. While a list of other possible side effects associated with watching 3D for a long period of time include:
Eye or muscle twitching, headache, vomiting, nausea, cramps, disorientation, loss of awareness and sleeplessness. Among the horde of large corporations cashing in with 3D technology, Samsung has indeed made a brave and praise worthy move of warning people regarding possible health hazards of watching 3D TV.
As we get swept away by the wonders of watching mind blowing 3D imagery in cinemas and now at home, it is worth asking the question about the nature of problems that it may bring along with it. On a personal basis I find the idea of 3D to be quite discomforting as there is no telling what effect it might have on the human brain itself when it is exposed in a state of self inflicted “ecstasy” of imagery. One question that I have not seen anyone ask as yet is the effect of such technology on people with mental illnesses and the possibility of ending up the same road due to 3D addiction. I don’t mean to jump to conclusions, however, I believe that there is extensive research necessary into the effects of this technology before we start embracing it freely and allowing vulnerable minds of our children to be exposed to it.

Wednesday, May 25, 2011

HTC Desire S Review


When HTC launched the Desire and the aluminum bodied HTC Legend, it created two of the most popular Android devices in the market. So much so that Google basically took the HTC Desire and named it the Nexus One ie the first Google phone. Fast forward to 2011 and we have the successor to the original Desire ie the Desire S. Is it still as ‘desirable’ as the original? Read on the FoneArena HTC Desire S Review to find out!
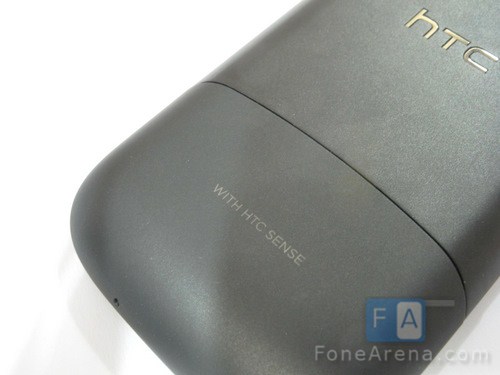

Hardware

Coming from the impeccable construction of the new Nokia devices , I was pleasantly surprised when I first held the HTC Desire S in my hand. The aluminum build feels great in the hand and makes the device quite a looker too. The back of the device is part aluminum and part soft plastic. The split three part design looks nice and actually is useful as the lower plastic panel can be removed to replace the battery , insert SIM card and put in a memory card as well.  Point to be noted is that changing the memory card requires the battery flap to be opened and this will shut off the phone.

The rear of the phone also sports the 5MP camera along with an LED flash , a speaker grille. The front of the Android smartphone has the 3.7” S-LCD screen , four capacitive buttons , the earpiece grille and a front facing camera. The screen is of the SLCD variety which has excellent contrast levels and looks absolutely delightful. It might not have the absolute black levels of SAMOLED but we didn’t miss that much. On the other hand, sunlight visibility was pretty bad. In comparison to the CBD screen on the Nokia E7, the SLCD fared quite badly and was almost invisible in bright sunlight. This is especially a problem in a country like India and if you spend a fair bit of time outside. The screen is of course covered by the famous Gorilla Glass and remains fairly free of scratches even when placed in a pocket with keys and coins.
The capacitive buttons are a bit of a hit or miss. The buttons work as advertised along with the appropriate haptic feedback but the backlight did play spoil sport a few times. This is obviously a problem if it fails to light up in a dark environment. However the problem didn’t occur enough times to be a major issue and can hopefully be patched up in a future software update.
Moving on to the inner hardware, the Desire S runs on the second generation Snapdragon processor along with the Adreno 205 graphics chipset. While this may sound old in comparison to the dual core monsters out there, trust me when I say that the Desire S is definitely no slouch.


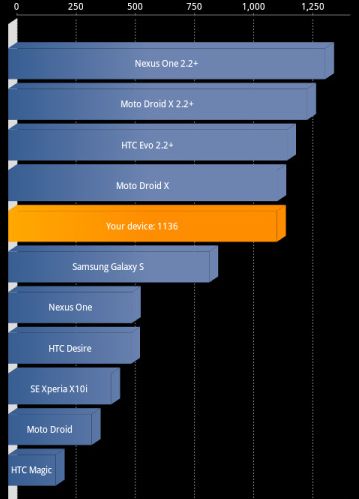
As our benchmark scores will indicate, it ranks high amongst the single core devices out there and shares silicon with the Sony Xperia Play which makes it ripe for that Playstation certified branding which we hope does come to the device. We’d love to play some Final Fantasy VII on this!
15% faster in comparison to the chip in the previous Desire, the RAM has also been bumped up to a generous 768MB which makes the Desire breeze through even the most heavy apps. Sense UI remains extremely slick and smooth even when trying to stress the phone which shows how well optimized it actually is. The 1450mAh battery is fairly adequate when coupled with the Gingerbread OS on the Desire S as the newest version is known to be a bit lighter on the battery. Along with the more frugal Snapdragon chip, the Desire can last a day with moderate levels of usage. With careful battery management and light usage you should be able to get a few days usage without recharging the phone.

Camera

One of the things that smartphones are fast replacing is point and shoot cameras. The best camera is the one which you have with you and your phone is always in your hand. Make the cellphone cameras good enough and they can replace the point and shoot. The Nokia N8 has set a bench mark in the category and we expect other manufacturers to step up. Recently in our SE Arc review we noticed how good the camera is, unfortunately the Desire S takes several steps back.

We are not believers of the megapixels game but expect that even if “only” 5MP , the camera should be able to capture quality images. The phone instead captures grainy and often even fuzzy images. On the phones screen or even at web resolutions, the images look decent but look at them full size or try cropping into them and you will notice the constraints of the excessive post processing and the tiny sensor. HTC does add in some fancy filters to fulfill the needs of hipster photography addicts J Even the video which is captured at 720p fails to impress. The camera is one area where HTC needs to seriously improve. To its credit, the camera response is almost instantaneous and the HTC Camera UI layer is nice and easy to work with.
The front facing camera is present for video calling. With Gingerbread 2.3.4 , Google has added video calling support to Gtalk so you should be able to enjoy that on your phone once you get the update. Just don’t expect to take any photos with that camera as in anything other than well-lit conditions you will have to deal with color spots, excessive noise.
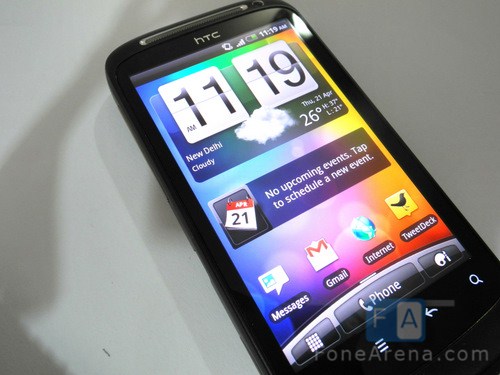
Software

Android and Sense UI greet you when you switch on the HTC Desire S. Sense remains the same as you remember it, indeed if there are not many surprises here. HTC has effectively covered the entire Android UI and so you will either like it or you won’t. If you are looking for a native Android experience you might as well start looking at other devices now, HTC has done an expert job with Sense UI and it remains as slick as ever on the new generation silicon. There are quite a few usability improvements in the software package. The lack of the optical trackpad is covered up with the presence of a software tweak that lets you place the cursor in the text with the help of a magnifying glass which pops up.
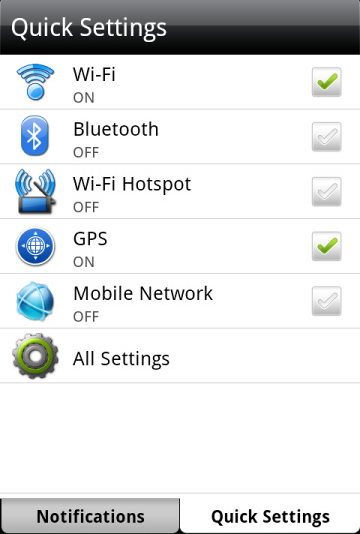
Sense UI also finally incorporates a quick settings tab which makes it infinitely more convenient to change often used settings like Bluetooth, mobile hotspot. Of course you could also use a widget for that but having the option is good.
There has also been a bit of overhauling on the widgets front with the Desire S offering a variant of the well-known HTC Clock which eschews the weather aspect of the clock and puts in a social feed option. It works like you would expect it to, pulling in your Facebook and Twitter updates. Like always, you get seven home screens to fill up as you wish with the first capacitive button working to give you an overview of all the screens at once.
A newer method of app sorting is also included with Sense UI. The layer now allows you to also sort apps by downloaded and recently used. The menu drawers are paginated and not free flowing which became a bit of a chore when trying to scroll down to an app placed lower in the menu.
Overall , it is a nice and smooth UI layer which is now beginning to show its age. We really do wish that Sense UI 3.0 shown off on the Sensation would also come to the Desire S.
Web browsing remains excellent as is seen on Android devices. Provide it with a sufficiently fast data source and the Desire S will churn through web pages. Flash 10.2 was on the sluggish side with the phone struggling to play back 720p Youtube content.

Conclusion


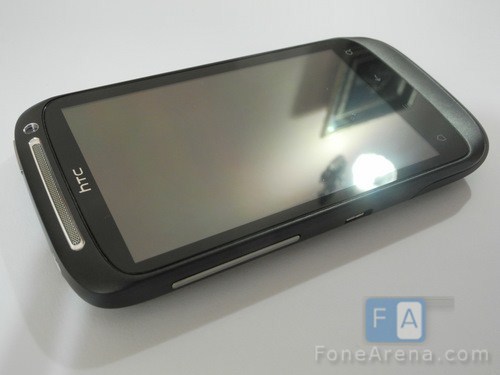
The Desire S is a well-designed piece of kit and can be easily recommended to anyone looking for a midrange Android device. It is easy to work with even for users new to the Android OS. Major improvements in battery life, better construction and software enhancements also make it a possible contender for people looking to upgrade from the original Desire. Long term viability of said purchase is questionable due to the incoming onslaught of dualcore devices and the increasing number of applications which make use of the extra power available to them.
Pros
1. Great build quality
2. Smooth performance
3. Gingerbread !
Cons
1. Camera quality
2. Lighting problems with capacitive keys
3. Sense UI is starting to feel stale

Sn0wbreeze 2.7 Guide: How To Jailbreak iPhone 4, 3GS, iPad, iPod Touch On iOS 4.3.3

Sn0wbreeze is updated to the latest version 2.7 to support the jailbreak on iOS 4.3.3 as well as iOS 4.2.8 untethered on iPhone 4, iPhone 3GS, iPad, iPod Touch 4G, 3G. With the new Sn0wbreeze, you can enable multitasking gestures from the Settings app after jailbreaking.
jailbreak iPhone 3g n 3gs
Here is the complete guide to jailbreak your iDevices on 4.3.3.
  • Download and install Sn0wbreeze 2.7 
  • Now run the sn0wbreeze and browse for the IPSW file, let allow sn0wbreeze to recognize the file.
  • Follow to next screen and select “Expert Mode” and click continue. Then select “Build IPSW” and click next.
  • Sn0wbreeze will start building custom iOS 4.3.3 firmware, meantime you can play Pacman to get relaxed.
  • Now stored the built custom iOS 4.3.3 IPSW to your desktop.
  • Connect your iDevices to the system in DFU mode which can be down as follow:
    Connect your device to your system using data cable and switch it OFF> then Hold POWER and HOME buttons together for 10 seconds>Release POWER, keep holding HOME until your Computer gives a beep sound recognizing your iPhone as a new USB device.
  • Now launch the iTunes and select your device to from left panel and then click SHIFT + RESTORE button.
  • Browse the custom IPSW file from desktop and restore with it.
That’s all you need to do!
Note: If you have earlier edited the Hosts file for downgrading iOS firmware, then make sure you revert the changes you made to the file by removing the gs.apple.com entry. Otherwise you may encounter error 3194+ in iTunes.

ExtraZoomS^3 [Camera Hack]


Xtended zoom in our S^3 default camera app. 10x zoom aprox.
In N8, now you can adjust the zoom with the volume keys.
It works in all S^3.
The phone must to be hacked. See this post to hack your Nokia phone.
Download attached sis.
-------------------------ADDED--------------------------
01. ExtraZoom
02. N8-30FPS Video-100% photo compression quality
03. C7/E7-30FPS Video-100% photo compression quality

Hack your S^3 Nokia Phones


Follow these instructions at your OWN RISK !!!!!!!!


Required Downloads:--
  1. CertHack.zip
  2. Juasthackit

Root Certificate Hack!


1. Install CertUpdater.sisx
2. Sign CertHack.sis using your own Devcert
3. Install signed CertHack twice!
-. Phone now hacked!

You can sign and install any package using Leftup certificate (see Leftup.zip folder)

Is it Easy? Yes, it is VERY Easy!
Fast and easy hacks to you all!

Enjoy!


Symbian^3 - Tips & Tricks

You might know most of these shortcuts, but I wanted to collect them up here, since lot of people doesn't seem to know all these. Knowing these can improve the usage a lot IMO. Wink

Keypad shortcuts (Select "Call" from homescreen)
- Bluetooth ON/OFF: longpress on '*'-key
- Call log: press call key
- Contacts: press on contacts icon
- Open browser: longpress on '0'-key
- Silent profile: longpress on '#'-key

Keypad codes (Select "Call" from homescreen and type...)
- *#7370# does hard reset
- *#7780# does soft reset
- *#06# shows your IMEI
- *#0000# shows info about phone software
- *#92702689# (*#war anty#) shows lifetimer 
- *#2820# (*#BTA0#) displays the Bluetooth device address of your phone
- *#62209526# (*#MAC0WLAN) displays the MAC address of the WLAN adapter

Clock and Profile -widget
- Active and edit profile: press on profile name on the widget
- Calendar: press on date on the widget
- Clock: press on clock on widget

Notifications popup (press on battery icon)
- Clock: press on time on the popup
- Connectivity settings: press on connectivity icon on the popup
- Powersave mode ON/OFF: press on battery icon on the popup
- USB mode: press on USB icon on the popup (when connected) to switch USB mode without unplugging
- WLAN-manager: press on WLAN connection on the popup (when connected)

Miscellaneous
- Alarm Enable/Disable: Set alarm to repeat, then you can disable and enable it
- Animated Themes: Nokia default themes (not Midnight pack) have animated backgrounds, just active it from theme settings
- Data Counter: Open call log and tap on right tab to view data transfer log. 
- Disconnect all networks: longpress with red call key
- Edit Homescreen: longpress on anywhere on the homscreen changes to edit mode
- Faster Homescreen: turn of theme effects from Themes settings to make switching between homescreens instant
- Favorites Widget: you can scroll the favorites widget horisontally and add more than four contacts, unlike in N97 homescreen
- Forced Reboot: press power key for eight seconds simulating "battery removal"
- "Full" Reset: hold "Volume Down + Camera Key + Menu Key" and press power button until your phone shake (Warning! Will remove some apps permanently like Ovi Store and Qt!)
- Mass Storage Mode: you can use the phone as mass storage while it's powered out
- Offline Masstorage: even though your phone is off you can still use it as USB Mass Storage via USB
- Predictive QWERTY: predictive text and word auto-completion are also supported on QWERTY, not only in keypad
- Screen Saver Notification: Use 'Music Player' screen saver to show new sms and missed calls icon on screen. Time, Date, Profile and Music being played will also be shown if enabled.
- Silence Calls/Snooze Alarms: turn around your phone upside down to silence calls or snooze alarms (set it on from Settings > Sensor settings)
- Special Characters: longpress on '1*'-character on QWERTY keyboard to input special characters like õ, ü, etc.
- Torch (n/a in N8): hold down keylock to use LED flash as a torch
- Two way Charge: Both USB and regular thin-pin adapters can be used for charging
- Two way Keylock: open keylock by sliding keylock button on side OR by pressing menu key and then press on the screen where it says "Unlock"
- Two way TV-OUT: use HDMI cable to get digital TV Out (only N8/E7) with HD resolution or use 3.5mm cable for composite TV out
- T9 Dictionary: Reset dictionary by deleting "C:\Predic"-folder (use X-Plore or such file browser)
- Voice Command: hold Call button in homescreen (setup voice command first)
- USB OTG: you can directly connect almost any USB device to the phone (including USB mouse, -keyboard, -pendrive and -external HDD)
- Widget settings: in homescreen edit mode, press on widget (Notifications, Mail, Search and Shortcuts)
- Widgets Online/Offline: select Options > "Widget to Offline mode" from homescreen

Applications
- App. Manager: Set java/flash app settings, like networking settings, warning queries and virtual keypad, via longpress
- Calendar: browse through days by swiping through screen from left to right or vice versa to browse back
- Camera: use Pinch zoom to switch between 4:3 and 16:9 aspect ratios (9Mpix vs 12Mpix on N8)
- Camera: double press on screen to zoom (like with browser)
- Camera: you can also zoom by using volume keys
- Clock: switch between analog and digital clock by tapping the big clock shown on screen
- File Manager: connect to a network drive by choosing the setting from options menu (instead of Settings)
- File Manager: jump down on folder tree by pressing on one of the folder icons on top of the screen
- File Manager: open search bar by lightly pressing on camera key
- File Manager: long press on drive to format it or set password for it
- File Manager: Hide pictures from gallery by putting them under "system" in any drive, also subfolders can be used. Alternatively create "_PAlbTN" folder anywhere.
- FM Transmitter: power up the FM Transmitter while playing music. Close or exit the music player, after a couple of seconds the FM transmitter will automatically switch off. When you turn on the music player, FM transmiter will also turn on. No need to switch transmitter on and off now if you primarily use it in your car
- Gallery: Three ways to zoom pictures; by making a double press, a pinch zoom or by using volume keys
- Mail: Collapse and expand all days by doing longpress on a day
- Menu (App. Grid): instead of leaving it to background, choose Options > Exit
- Profiles: set profile (except general and offline) to change based on time of the day from profile settings
- Ovi Maps: share current (or favorite) location via MMS or E-Mail to any other Nokia device with Maps
- Task Manager: open Task Manager by doing longpress on (physical) menukey on the phone
- Task Manager: longpress on any of the apps to bring out option to close invidual or all running apps
- Lost Application (general): in case you accidently delete some of Nokia applications, like Communities or Midnight theme pack, use Software Update re-install it


Feel free to post other handy shortcuts and I'll add them here.

Tuesday, May 24, 2011

Unlock Samsung Galaxy S II With SIM Unlock Code Finder App [How To Tutorial]

If you got your Samsung Galaxy S II with a SIM lock, meaning that your carrier barred your phone from using any other company’s SIM card, then there is some great news for you! There is now a free app available in Android Market that searches for your Samsung Galaxy S II’s SIM unlock code. Apart from this, the app can also find unfreeze code that might help if running SIM unlock code search feature lands your phone in an unresponsive state. Samsung Galaxy S II SIM unlock code finder is based on XDA developer Odia’s mode and has been compiled plus released in Market by Chainfire.


The procedure is simple and all you have to do is follow the instructions below to SIM unlock your SGS II:

sim-unlock-sgs2 sim-unlock-sgs2-1
  1. The first step is to download SGS2 SIM Unlock Code Finder from Android Market on your phone. In case you aren’t located in US or this app doesn’t show up in searches, then use Market Enabler app to enable any US Market.
  2. Once you have downloaded the app, launch by tapping it from your homescreen. 
  3. Now simply tap on Find SIM unlock code button and wait for the app to search for it.
  4. Once the code shows up, write it down on a piece of paper or anywhere you like.
  5. Power off your device, insert some other carrier’s SIM card and reboot your device.
  6. Now the phone will prompt your for an unlock code.
  7. Write the code you previously noted down and wait for the SIM unlock to happen.
And if you are successful and your code is right, you will now have a SIM unlocked Samsung Galaxy S II. Please note that Chainfire has categorically asked users to avoid redoing the procedure if it doesn’t unlock or gives a wrong unlock code. Repeating this procedure might end up your SGS II in a freeze state, and you might have to use the same app for Unfreeze code. For more details, support and feedback, you can visit the official XDA thread

Monday, May 23, 2011

Samsung Galaxy S II gets sim-unlock method, KE7 firmware update

galaxy2 seine Samsung Galaxy S II gets sim unlock method, KE7 firmware updateSamsung is pushing software updates to Galaxy S II like anything; smartphone is getting another update in the some European countries. This is the third update to hit this Android flagship from Samsung.  There is no official changelog, but according to users this update brings improved battery life, more free RAM on start-up and improved camera support. Dubbed as KE7, you can download it now via Kies.
On the other hand, you can now unlock your sim-locked Galaxy S2 after playing with some system files on the smartphone.  The current lock solution is not the easiest one and you can wait for some days for an easier one to appear from devs at XDA. If you cannot wait, you will need a rooted Samsung Galaxy S and then extract nv_data.bin file from your phone and follow four more steps given here to enjoy the benefits of sim-unlocked phone.
Via SH | SH

Is this the upcoming Sony Ericsson Cybershot Android Phone?

sony cyber shot concept Is this the upcoming Sony Ericsson Cybershot Android Phone?
We have been hearing rumors of Sony Ericsson coming with a Cybershot Android smartphone. While the first leaked shot was a hoax, we might have real renders this time. Nothing confirmed still but Cybershot series of Android phone might be a reality after all.
There is no word on the specs, but it looks to have 3.7 inch display, Android 2.3, 16MP camera and front cam.

Sunday, May 22, 2011

Install Android 3.0 Honeycomb Music Player On Any Android Device


Following the hype since Google’s introductory event held a couple of week’s ago, Honeycomb and itsAndroid-Honeycomb-MUSICfeatures have been the talk of the geek town lately. Google proudly showcased them one by one and was graced with much applause. One of these showcased features that was direly needed was the revamped Music Player to bring a much needed visual improvement on Android’s default music player.
The new player offers you much more in terms of dynamic colors on album art, song searches and the newly popular Google Music Sync over the air. If you’re up for installing, running and testing it, go ahead and read on.
This Honeycomb music player can be installed on any Android device without any issue and has been tested to work by several users across a range of devices successfully. Let’s take a closer look at the features offered by this updated music player app.
Features:
  • The Media Library looks much like the Media Gallery on the Froyo and is made up neatly scrollable thumbnails, displaying the album art for all your music.
    image
  • snap20110214_204314Once installed, two icons are found in your App drawer. One is Music and the other one is JumperTest. JumpterTest ,as it is obvious from the name, is still a procedure under testing and is going to bring you Google’s hyped Music Sync across your devices i.e. you will be able to stream music from your desktop and from the cloud, down to your device. The application offers your three tabs, Start Peer, Stop Peer & Import Local Media. The application apparently also allows you to cache streamed music on the device for later listening. Once you Start Peer, you’d be able to have straight up options for Music Syncing in Music Settings in the Music Player.
  • There’s a search button you can use on any song, long tap and hold on any song in the library and it pops up with multiple search options, a neat option is to search for the song directly on youtube and watch its video , alternatively a browser based search can instantly land you on the lyrics.
  • The background of the Music Player adopts to the main color theme of the album art of the song that is being played, this adds a more dynamic liquid feel to the whole look of the player giving a unique background for every song, a much needed change from the default black.
snap20110214_204349snap20110214_204151snap20110214_204050
While these are the most notable features, there’s a lot of subtle changes one gets to see during the use of the player itself. It should, however be noted that the port is not entirely stable on some phones, again an inherited issue with cross-platform ports. On lower end devices like the Milestone, the audio has noticeable jerks during playback if any other heavy application such as Dolphin Browser is opened. However, this is ignorable for those who are keen on the eye candy.
Now that you have had a feature tour, lets get down to to installation.
Requirements:
Procedure:
  1. Download the APK and transfer it to your SD card.
  2. Use your favorite APK installer to install the application.
  3. No third step – this one’s just this simple.

LauncherPro Developer Releases WP7 Music Player Look-Alike For Android


Windows-Phone-7-Like-Music-Player-For-Android
We’ve seen Windows Phone 7’s simple yet elegant “metro” user interface duplicated on Android in homescreen replacement apps the likes of Launcher 7, 7 Launcher and Metro UI. LauncherPro developer, Federico Carnales is working on a “WP7ish music app” for Android. The developer released an alpha preview of his Zune Music Player doppleganger yesterday on his Twitter account, mentioning that it was yet to be given a name.
Apart from the fact that this Android ‘Metro Player’ (let’s just call it that for now) does not, of course, support Zune integration, it is close to identical to Windows Phone 7’s native music player. The user interface is an absolute gift for the eyes and the animations are smoother and faster than those seen in the aforementioned WP7-style launchers. We’re hoping that the player doesn’t run into legal trouble if and when it finally hits the Android Market. It would be a welcome addition to the shelves and an undoubtedly sleeker, less bland alternative to the stock Android music player.
Fede's-Music-HomescreenBrowse-by-letter
Just like in the WP7 native music player, you can switch between artistsalbums, songs, playlists andgenres by simply swiping across the screen. Tapping an alphabet tile in the artists, albums or songs tabs brings up an alphabet grid for quick browsing. While within the player interface, tapping the album art of a currently playing song reveals Repeat and Shuffle toggle switches. Selecting the list of songs below the title of the currently playing song brings up the entire playlist.
The player is surprisingly stable and feature-wise complete for an alpha preview. The only essential feature that is missing as of this writing, is a search bar, or rather, support for the Search button.
AlbumsPlayer
You can grab the alpha preview from the link below. To install the downloaded APK, you must enable installation of non-Market applications on your device. To do so, hit Menu while on the homescreen, then go to Settings > Applications and check Unknown sources.

[How To] Mount Windows Phone 7 As USB Disk


Windows Phone 7  is decent mobile platform but it also lacks some basic things that every one ( if not all most) of people wants in there phone . USB storage is also one of them. As we know that WP7 like the iPhone does not give excess to the storage card as removable disk on any PC OS windows Linux or Mac . It also does not allow you to use BlueTooth to transfer your files.
So here is one solution for the USB Storage Problem ..
DA-Developers forum member MarcHoover has made this all possible via a tool that is now invaluable considering the convenience and freedom it offers to the user.

The tool called WP7 USB Storage Enabler is very simple to use. However, before you move onto using this tool there are a few things you need beforehand. You should have Zuneinstalled on your system with at least one device having been connected to it once. Lastly, you must have.NET Framework 2.0 installed to begin with using the tool.
wp7-storage-enabler

Please make sure that Zune is closed before you run this tool and the device is not connected via USB to the PC. You will have to run the tool with Administrator privileges in Windows 7.

Hit Enable as seen in the screenshot above and connect your phone to the PC. Once done you will see the drive in your MY COMPUTER area.
Download from here.